MyFreeCopyright.com Registered & Protected

November 30, 2010

Christmas Cards Cricut Cartridge

Recipe-
Post-it Craft Paper (Lucky,Lime,Coco, and white)
White Gel Pen
Marvey "Snow Writer" pen
Christmas Cards Cartridge


For this project SweetSassyDiva asked us to make a Christmas card using the Post-IT craft paper. I have been wanting to make all of the cards from the Christmas Cards solutions cart. So I figured I would start with this one. I followed all the layers on the cartridge and everything was cut at 6 inches (the card it self measured 5.5x5.5 I must say that the more I used this sticky paper the more I REALLY like it. A lot of the carts don't have the best directions for layers, and I had to pull up the images a few times before I figured out what went down first and so on. If I had been using regular paper with a tape runner I would have had to re cut more than a few times. I know I know measure twice and glue once, but I forget to do that quite often. All the little swirls were so much easier to work with since they acted like a sticker instead of having to glue tiny pieces. I then used my gel pen to add some dimension to the background and used the snow marker to add all the snow (man I love that pen too!)


Summer


November 29, 2010

Joyful Christmas Card!

Joyful Christmas Card
This card was such a joy to make with the new 3M Post-It Craft Paper
RECIPE
12X12 WHITE CARD STOCK - CUT TO 8.5X5.5
RED 3M POST-IT CRAFT PAPER CUT AT 4.25X5.25
WHITE 3M POST-IT CRAFT PAPER CUT AT 4.0X5.0
3 STRIPS PATTERNED CHRISTMAS PAPER CUT AT 5.0X1.0
SMALL PIECE OF GREEN CARD STOCK
Ok first I created on Sure Cuts A Lot my basic card cutting file which is included here...just click on picture to download
I then folded the largest cut which was my white card stock in half this is your card base
the second cut which in this picture is showing green was my red 3M Post-It Craft Paper
I peeled the back off the post-it paper and applied to the white...easy peazy!
then your next cut in the picture is showing as light blue...I cut white 3M Post-it Craft Paper
Again easy peasy...peel the backing off and attach to the red
You next cut is showing as light green strips...you may use ribbon or I used the cuts on some really nice Christmas Patterned Paper I had and used my snail glue to adhere to the project.
Now instead of the big square cuts to go on top of everything I chose to cut my scalloped green cardstock on my Imagine using one of the included shapes...it was then stamped with the greeting and some glitter glue applied in a few areas and inked around the edges and dimensions added to pop up on the card for dimension
Next, I cut the small green and white labels from 3M Post-It Paper and affixed to the card and then wrote 2010 with my Martha Stewart Gold Glitter Pen
Then, for extra dazzle the tree was just something I already had that I thought would be cute...then I created the snowflake by cutting on my Imagine from my Winter Lace Cricut Cartridge set at 2.5 inches out of white 3M Post-It Paper...then peeled the backing off and applied ultra fine glitter to the tacky side (which I might add is so much easier than trying to glue and glitter on something so detailed) ... I then pop dotted it on to the card
Hope you like my project
Laura
My Embroidery Store  - Embroidery Designs
Imagine What You Can Do - Clipart, Custom Cards, and Embroidered Gifts

November 28, 2010

Sweet Little Friend!

SWEET LITTLE FRIEND ACCORDION ALBUM - POST-IT CRAFT PAPER FULL ADHESIVE


This album was so much fun. I got the inspiration for it from spending the day with my friend Lucy at our "Once A Month" day where we get together at each others house and have so much fun crafting while our hubbies watch movies.


It didn't cost me any "new" money. I used the Post-It Paper that was provided the Design Team to try out as a sponsor for SweetSassyDiva. I then went to every drawer and cubbyhole that I have and dug up stuff to use on it. I made up my mind when I started that I wasn't going to stress if the colors did not match exactly. My goal was to try out the Post-It Paper (Love It!) and to use all those embellishments that had been begging me to use them.


The front side has all little goodies that say friend, friendship, or memories. The back side has pockets that have sayings about friends and friendships.


I challenge you to make one using all your left over "stuff." You will feel good about it when your done.


Supplies:


Lime and Lipstick Post-It Craft Paper Full Adhesive Papers

Thin Cardboard from the back of a Paper Pack

Left over Patterned Pink and Lime Papers from my Scrap Stock

Craft Lace

Two Different Size Flower Punches

Pink Button Brad

Thin Pink Polk-A-Dot Ribbon and 3/8" Pink Ribbon

Vellum Friend Quotes from Creative Memories

Various Leftover Embellishments with Friend or Friendship Related

Pink and Green Leftover Tags and Button

Scallop Punches

Pink Marker


Recipe:


Cut the cardboard into (5) 3 1/4"X 5" squares. (I did 5 because that is what I could fit onto the paper for the next step) You can do as many as you want.


Ink around border of each card board piece with the color of ink you are using for your project. (Since I used Lime and Pink, I choose to use Pink.)


Cut the Lime and Lipstick Post-It Paper the same size.


For the best fit of Post-It Paper over Card Board, use your Cricut to cut if you have one.


Lay the card boards down on your mat that has ruler markings if you have one. Lay them straight across and leave 1/4" between each one.


Adhere a piece of the large pink ribbon (I used 30") across the middle of all the cardboard's so that they will be attached together in a row. Then do the same thing 3/4" down from the top and 3/4" up from the bottom. This will allow it to stand up and hold together. If you want to save ribbon you can just put two inch strips to hold each one together at the top and at the bottom, but use the longer piece in the middle.


Peel the backing off the Lime and Lipstick pieces you cut from the Post-It Paper and adhere them one by one to the card board pieces (both front and back). I choose to alternate colors for contrast. They are easy to remove if you don't get them on straight the first time.


It is actually easier to do the back of the project for the next step because it will lay flatter when you go to embellish the front.


Make (5) 3 1/4"X 3 1/4" squares out of coordinating patterned paper to make the pockets.


Tear each square back to front at an angle. Make sure you have your pattern in the right direction before tearing so you won't tear it along the side instead of the top.


Adhere each pocket with the glue pen. Make sure you leave enough room for your sayings.


Find something fun or make sayings up on the computer to put in the pockets. I even thought of pictures of my friends, but I didn't have them handy. I used CM Friend & Family Quotes.


Punch holes in every other saying and tie the little ribbon in them. You can put ribbons in all of them if you want. Some of my sayings fit sideways, so I couldn't.


Turn the album over and embellish the front side.


Attach the lace to the tops of each piece. Cut your lace a little larger than each card board covered piece as the lace shrinks up a little when you glue pen it on.


Embellish away! Go through your stash and use all that stuff up that has been laying around.


The Album folds up like an accordion if you want to put it in the mail.


It will tie in accordion style a whole lot easier with an even number of panels. I only had enough Post-It Paper to make 5.


I hope you have fun making one tailored just for you.


Be sure and try out the Post-It Paper. It is easy to work with and rework if you need to.


Donna

November 27, 2010

Black Friday and Cyber Sales!

Check it out!!! I called it for months.....I figured the Gypsy would go to $99.99 for Black Friday and low and behold what did I find....... as I posted in a prior post....

Seems Michael's had it for under $100! So...if you have been comtemplating buying one......seems it is a great price!!!

OR.... today online I see that Die Cut central has them for $89.99!  And some carts for great prices like $17.99 and new ones for $23.99 even a licensed cart for $23.99!!! wow!!!

Did you pick up the Expression bundle at Walmart?  What color did you get?  Or from Menards?


Here is the Menard's Expression and look....Cricut Cartridges for $19.99. 

and new cricut lite cartridges at Walmart!  I hear that the Jolly Holidays is hot!!!! Some are sold out! I know you could order the machine and carts online but, I believe the carts went up to $25.00 and the Expression $225 online. 


There is also a 10% discount code to use on your order of a Scrap'n Tote and discount packages!  You can click on the picture of the Scrap'n Tote below to check out the deals.  I absolutely love the pink one!  These have been really hot so, be sure to order now.  They make a great Christmas present or....any day present! :)


what is the best prices that you have found lately for the new cricut imagine mats? i see 9.74 at joann any lower?


what about imagine cutable vinyl? what is your door buster pricing and where?

what is a door buster lowest price on the cricut companions? has anyone seen lower than $14.99?

and vinyl transfer tape 10.19? ooh and cricut cake blades of $10.00 for two?

i'm just upset that i bought at Joanns and then found some lower elsewhere and online Joann's said that i have to return online and that you can't at the store.  ooh and duh forgot to price match at Michael's with the Joann's ad.  I guess that is part of the hunt.  lol 

Anyone see any other rock bottom deals?

Be sure to check back tomorrow for some more projects.  Myself and the SweetSassyDiva Designers create new projects daily.  Be sure to check out the archives.   Why not use talents and craft your presents this year! 

I think there are going to be a lot of wonderful gifts coming!!!! woo hooo!!! I'm so excited!!! What are you hoping will be in your gift box?

Also, you can still get the Imagine ink deal by clicking here for more details!  It looks like it can only be from the retailers listed on the new form whereas the other rebate was more open.

Advent Calendar!


I folded the boxes out of patterned cardstock by getting the idea from this link. I played around with different sizes and mostly eye-balled it.


I used the Cricut cartridge Designers Calendar to cut out the numbers with the Post-It self adhesive paper. I used doubled stick tape to attach the boxes together. I also used the Post-It paper to wrap all around the box to hold all of the boxes securely. Then as a finishing touch I wrapped it in ribbon and topped it with a handmade bow.


I was thinking of putting little pieces of candy in each box and then a big piece for box #25.


Jasmine

Calendar/Countdown Cubes!

Calendar/Countdown Cubes


Recipe:

3 - Post-it craft papers, full adhesive (sand, evergreen, & crimson)

2 - Paper mache cube Christmas ornaments (approx. 2.5in on all sides)

12 - different Christmas patterned papers (2 3/8in x 2 3/8in squares)

Old West Cricut cartridge

Cricut Machine

Cuttlebug

Sizzix tropical paisley embossing folder

ATG Gun


Instructions:

First I cut the patterned papers (mine are from the DCWV Holiday Collection the Christmas Stack) to the above size and adhered them to the paper mache cubes using my ATG gun.


I then chose the Evergreen, Sand, & Crimson papers from the Post-it Paper pack because they matched the rest of my papers best. Once I had the colors picked I decided which numbers I wanted which color (I decided to do a mix) making sand the shadow color to help the numbers stand out. I cut out the numbers 0, 0, 1, 1, 2, 2, 3, 4, 5, 6, 7, 8 (the 6 doubles as the 9) with the Old West cart using the Flourish Shadow setting at 1 3/4 inch using the Sand Post-it paper. I then cut a mix of the same numbers in both Crimson & Evergreen Post-it paper with the Old West cart using the flourish setting at 1 3/4 inch. I peeled the Evergreen & Crimson Post-it paper and stuck it to the middle of the Sand Post-it paper number cuts. Once they were all adhered together, I ran all of the number cuts through the Cuttlebug with the Tropical Paisley embossing folder, just to give it a little body. I then peeled the backing off of the numbers and placed them on the proper cubes, this I couldn't have figured out without the help of my husband (the Engineer lol). Pretty simple, and very cute.


It is meant to be a calendar (or count down), you just turn the cubes and switch them for the right dates!


I loved working with the Post-it paper! I cannot say enough good things about it! The colors are beautiful, it cuts so smooth and easy, and embosses like a champ! The thing that I loved best about it though was that it was adhesive backed, this is SOOOO nice for small intricate cuts, no tape showing through, no sticky mess with glue I just LOVE this paper!!!


Here is a picture of them with the banner I made last week. 


-Jamie

November 26, 2010

Santa Drawers!!!

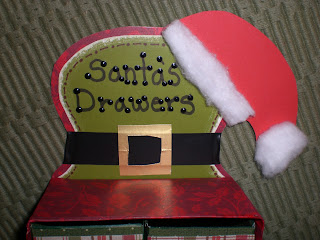
Hello! This past week I recieved in the mail a package-o-happiness!! It was a pack of the new 'Post-It' craft paper!! I couldnt wait to tear into this wonderful craft paper and here is the first thing I made with it. I got the idea from SCS :)


~*Santas Drawers*~


Recipe


~*Cardstock from DCWV Christmas stack
~*Green carstock from Post It
~*Red cardstock
~*Black electrical tape
~*4 white buttons
~*green ribbon
~*black paint
~*black Sharpie

~*Jen*~

Post-It Craft Paper!

Hi Everyone,


This week we were asked by Bobbi Jo to create a project using the new awesome Post-It Craft paper by 3M. WOW! I have to tell you this paper is awesome. It is regular craft cardstock that has adhesive on one side. It makes layering all those pieces you cut out with your cricut a snap to put together and better yet no need for glue..... And don't worry if you stick the cut-out in the wrong place it is repositionable.

Check out this video! 


If you are following though email, click logo below to view the video!


So for this project, I made a birthday card for my Stepdad.


Recipe:


Blue and green cardstock

Crimson Post it craft paper

Cosmic Post it Craft paper

Boys will be Boys cartridge- Lizard cut at 4 inches

Grass Friskers paper punch


Rebecca

November 25, 2010

Elegant Bag!


Hello all! Today I had the great pleasure to play with the Post-It Craft paper! I am loving it!!! Let me tell you why! I hate, and I mean HATE cutting all those intricate and delicate cuts (I called them swirlies) because when it comes time to glue them, well, it can get nasty!! All the glue is all over the place, sometimes it doesn't dry nicely and you can see spots and I hate how it looks. And for that reason I almost never use those cuts. I used the Elegant Cake cartridge and used it to decorate this cute little bag that can be used to giveaway a gift card (my momma already took the bag from me!). I used my Expression and it cut PERFECT!!! I love this paper!!!!!


Materials used:

Post-It Craft Paper in Black

AC Carstock for bag

Elegant Cake Cartridge

Bling and ribbon from collection


Abby

Happy Thanksgiving!


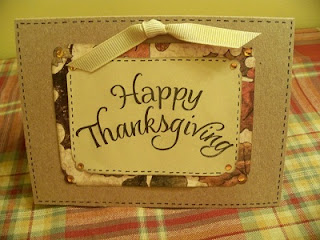
THANKSGIVING DAY CARD:


Yesterday my good friend Lucy and I had our monthly scrapbook/card making time here at the house. Don't you think is so much fun to create with a friend! Lucy came up with the basic idea and I just added some bling, ribbon, the turkey, and stitching.


Supplies:


Tan Note Cards from Paper Studio 4"X5.5".

Fall Patterned Paper Sheet

Buff and Chocolate Card Stock

Tan Ribbon

Bling

Black Marker (I like to write with the Vellum Writers)

Creative Memories Corner Punch

Dye Cut Turkey (I don't have the Cricut Fall Cart.)


Recipe:


Cut (1) 4"X3" square out of Fall Patterned Paper. (Cut all squares with Cricut, Trimmer, or Exacto)


Cut (2) 2 1/2"X3 1/2" squares out of Buff Card Stock.


Cut (1) 4"X3" Chocolate Card Stock.


Use a corner punch to punch all corners.


Use Black Marker to mark stitches all around card inside and out and around buff tags.


Stamp Happy Thanksgiving one Buff square and adhere it to the Fall Paper. Adhere to the Front of card.


Stamp Your saying on the other Buff square and adhere it to the Chocolate Card Stock. Adhere to the inside of card.


Place bling on corners of Buff squares and Fall paper.


Mark stitches all around turkey, place bling for an eye and adhere to top inside of card. (Use Fall Cart if you have one)


Tie ribbon in a bow or knot and adhere to front of card.


I was behind in doing my Thanksgiving Cards and got 8 done in about an hour.


Donna

The SweetSassyDiva Designer's and myself wish you a safe holiday! 
 
- SweetSassyDiva

SWEETSASSYDIVA DESIGNERS!


November 24, 2010

Not just for Halloween....Happy Hauntings!


Hello Everyone,


This is my project for the SweetSassyDiva blog this week, if you haven't noticed already... I love making frames. I made this frame using the Happy Haunting Cricut cartridge. This is such a super easy and quick project. I used the 3M-Post It paper to cut out the base of the tree as well as the layers. Wow, I love this paper, it was such a breeze to put the layers of the tree together since i did not have to mess with gluing them down because the back side of the paper is sticky already. I just distressed the layers with Tim Holtz distress ink and stuck them down. I put some flower soft on the tree to give it some extra texture and dimension. Hope you like!!


Recipe:


-Graphic 45 Pattern Paper

-Tim Holtz Distress Ink in Peeled Paint, Pine Needles, Vintage Photo and Walnut Stain.

-3M Post It Paper

-Prima Bling

-Flower Soft

-Stickles

-Cricut Cartridge Happy Hauntings and Christmas Solutions


Happy Thanksgiving Everyone!!

Mila

Best Friends Post-It Designer Handbag!

Recipe-


12x12 white card stock

White "Post It" craft paper

Best Friends Imagine Cartridge

Ribbon

Sticky Gems


I was so surprise and excited when a large package arrived at my home this week! Post-It had sent all of SweeSassyDiva's Design Team a starter kit for their new line of craft paper. My kids had been asking all day to do a fun project and the paper by 3M gave me a fun idea. The first thing I noticed was that the package of white craft paper can be printed on.


So, I found the 3-D image of a purse off the "Best Friends" cart and hit "fit to page" to get the largest possible purse.


Assembly:


Then I put the "post it" craft paper on my Imagine mat, I printed and cut different images from "best friends" to make my own stickers (I cut them at 2 inches, but I kinda wish I had made them a bit larger).


My girls were able to fold the purse together and loved decorating using ribbon, sticky gems and the post it "stickers" since they are re-positionable they could pick them move them where they pleased and I loved that I didn't have to bust out the messy glue ! So a big thank you to 3M, I cannot wait to keep using this new line of sticky paper!