

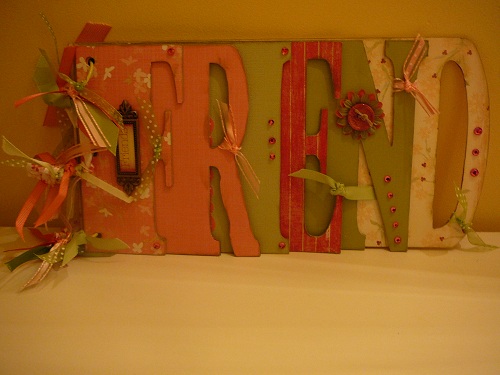
Cardboard Friend Album

Supplies:

Cardboard Friend Album
3 Circle Cinch Hooks (I used lime green for mine)
Cricut Cartridges that have frames (I used Disney Princess Happily Ever After for most of them)

Cuddle Bug and Dot and Heart Folders
Various Green and Pink Ribbons
Pink and Green Card Stock
Patterned Papers with Pink and Green
Adhesive Machine
Pink and Green Bling
Paper Flowers and Button
Friend Quotes from Creative Memories (I will change these to be friends names when I finally get the pictures in the album)

Recipe:
Cut all papers 6 inches by 12. Remember the 6" will be from top to bottom so that you have your patterns going in the right direction. You can use scraps for the first few letters.

Run them through an adhesive machine if you have one.
Choose what colors you want on each piece before you start cutting.
Alternate colors as you will be doing front and backs and you want them to coordinate.
Cut the ones for the "F" at 3 1/4", "R" at 5", "I" at 6", "E" at 7 1/2", "N" at 10", "D" at "12". You need to measure each letter in album you are doing for exact measurements. Since the letters are usually 6" tall and 12" long, you don't have room to play. I use a lot of scraps until I get to the larger letters.
Of course, tear the adhesive off each piece and then do the following step for each letter.
Start by placing the "F" on the piece of paper you want as your front cover. Then cut around it with an exacto knife.
Then do the same thing for the back of the "F" and then do each of the other letters both front and back.
The "D" will be the hardest to fit on the paper because it is exactly 6"X12" so you need to measure your album page and be exact.
Cut various frames in various sizes using scraps for the R, I, E, N, and D to put pictures in. I cut mine at 3 1/2" X 3 1/2" for the "I", 4 1/2X 5" for the "E", 4 3/4"X3 3/4" for the "N", and 4 1/2"X 5" for the "D". I did mine small because I don't like anything to show when the album is closed.
Run each frame through the Cuddle Bug (I used the ones with dots and hearts)
Put Album together with Cinch Hooks prior to next step for easier alignment.
Adhere frames on right side pages so that they don't show when you shut the page in front of it. (Make sure you leave the top of each frame open so you can add a picture later. )
Put Bling, Flowers, and Ribbons where you want them on each letter.
I put little friend quotes on scrap borders for now, but will change them later with friend names

Cover each Cinch Hook with Ribbons so the hooks don't show.


1 comment:
Great book it is very cute
Post a Comment